How to add Item / Sku's to your Proboxx portal
How to add item / Sku's to your Proboxx portal
Here is a full step by step guide on how to add item / Sku's to your Proboxx portal.
Would you like to watch a full tutorial video ?? Pls check the following link:
https://www.loom.com/share/a1f73a714aed46e2bfb28ec31a949c95
Would you like to watch a full step by step guide on How to add item / Sku's to your Proboxx portal?
Pls check below full detailed guide:
Now you can easily keep all your SKU items under one "umbrella".
Use Proboxx's new feature to save all your SKU details in one place.
Now, creating a new RFQ is easier more than ever.
In the following Scribe - we will show you step by step on how to save your SKU and create a RFQ just in 15 sec.
1. Navigate to https://app.proboxx.co/quotation/edit/63f1db14c5f399b511b62ddb?section=0
2. Under the main dashboard, click "Items / SKUs"

3. Click "Add SKU"

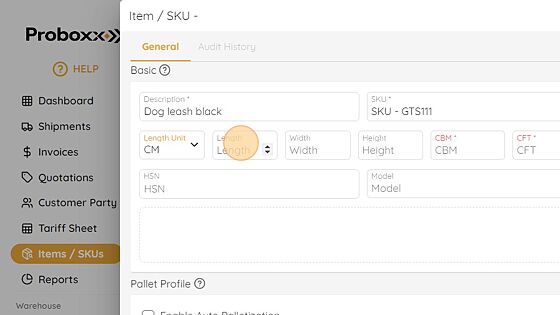
4. Add product description under the "Description *" field.
* As an example in our dummy account my main product is Dog Leash - Black

5. Choose the "Length Unit" of your Master Carton (CM or in Inch)

6. Select your MC dimension preferred unit.

7. Add your MC box dimensions "Length / Width / Height" field.

8. Once full MC dimensions will be added to the system, the total CBM / CFT per MC will be calculated automatically.

9. Click the "Package Type *" field.

10. Click the "Package Type *" field and choose boxes or pallets for your specific SKU

11. Choose the "Weight Unit" and select your box dimension preferred unit.
(KG or LB)

12.For this example we use our dummy account and selected KG.

13. Add the "Weight" per MC field.

14. Click the "Total Units (Pcs Inside)" field.

15. You can add also the "Currency" field per MC & the cost per MC

16. Add the price of each MC / pallet

17. You can also add the exact model of the product under "Model" field.

18. You can also choose the Manufacturer / Shipper from your Customer Parties list which associate with that product.

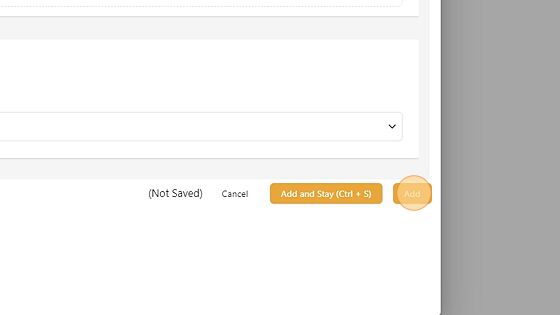
19. Click "Add" to finalize the SKU item process.

#### Once SKU details has been implemented, the SKU details will be saved forever in Proboxx portal.
#### Now, you can simply add your SKU details and create a new RFQ in less than 15 sec.
20. Now your SKU details is saved forever on the Proboxx portal for future use such as creating a new RFQ.

21. The "Cargo Description" field is now a dropdown and you can choose the specific SKU you need to ship out using Proboxx.

22. Click & choose the specific SKU

23. All your SKU details will appear automatically.
Just do not forget to add the box / pallet quantity for that specific shipment.**

24. Thank you for choosing Proboxx!

We are excited to get you going.
Here is a full step by step guide on how to add item / Sku's to your Proboxx portal.
Would you like to watch a full tutorial video ?? Pls check the following link:
https://www.loom.com/share/a1f73a714aed46e2bfb28ec31a949c95
Would you like to watch a full step by step guide on How to add item / Sku's to your Proboxx portal?
Pls check below full detailed guide:
Proboxx Workflow - How to add Item / Sku's to your Proboxx portal
Made by Amit Rosenthal with Scribe
Now you can easily keep all your SKU items under one "umbrella".
Use Proboxx's new feature to save all your SKU details in one place.
Now, creating a new RFQ is easier more than ever.
In the following Scribe - we will show you step by step on how to save your SKU and create a RFQ just in 15 sec.
1. Navigate to https://app.proboxx.co/quotation/edit/63f1db14c5f399b511b62ddb?section=0
Adding SKU / Item to Proboxx portal
2. Under the main dashboard, click "Items / SKUs"

3. Click "Add SKU"

4. Add product description under the "Description *" field.
* As an example in our dummy account my main product is Dog Leash - Black

5. Choose the "Length Unit" of your Master Carton (CM or in Inch)

6. Select your MC dimension preferred unit.

7. Add your MC box dimensions "Length / Width / Height" field.

8. Once full MC dimensions will be added to the system, the total CBM / CFT per MC will be calculated automatically.

9. Click the "Package Type *" field.

10. Click the "Package Type *" field and choose boxes or pallets for your specific SKU

11. Choose the "Weight Unit" and select your box dimension preferred unit.
(KG or LB)

12.For this example we use our dummy account and selected KG.

13. Add the "Weight" per MC field.

14. Click the "Total Units (Pcs Inside)" field.

15. You can add also the "Currency" field per MC & the cost per MC

16. Add the price of each MC / pallet

17. You can also add the exact model of the product under "Model" field.

18. You can also choose the Manufacturer / Shipper from your Customer Parties list which associate with that product.

19. Click "Add" to finalize the SKU item process.

#### Once SKU details has been implemented, the SKU details will be saved forever in Proboxx portal.
#### Now, you can simply add your SKU details and create a new RFQ in less than 15 sec.
20. Now your SKU details is saved forever on the Proboxx portal for future use such as creating a new RFQ.

21. The "Cargo Description" field is now a dropdown and you can choose the specific SKU you need to ship out using Proboxx.

22. Click & choose the specific SKU

23. All your SKU details will appear automatically.
Just do not forget to add the box / pallet quantity for that specific shipment.**

24. Thank you for choosing Proboxx!

Made with Scribe
Updated on: 23/02/2023
Thank you!
